Friday, 2 March 2012

Lazers and security

        Just a quick update on the progress of the secruity system in my film,  Nearing the end of the film Newton will have to navigate his way through a lazer field.  The lazers them selves are 2 pieces of simple cylyndrical geometry placed inside each other,  one with a 35% transperancy  so  it is visable and the room lights react when they cross, and the other has a glow applied to it but the geometery source itself is hidden.


Light fog and fade

Full scene


Reacting with props and enviornment.

A huge Thank You..........

I just want to say a massive thankyou to Anna and Arkadiusz from the 'Glassduo' for helping me with the musical score for my film, their work is truely staggering check them out at

http://www.glassharp.eu

Thanks again guys!

Learning through Science!!!

I had a lot of fun over the past two weeks designing physics and science posters to decorate my museum with...  Subtle PS cutout effects make all the Difference!

Welcome to Oak Ridge


Schrodinger's spectrum


Dr Frechette, Swing Physics


Foton world


Galileo and Acceleration


The Blackboards


Flight Physics!

Newton Finished Fur (Maya)

Once I sorted out my mapping issues I got to fine tuning Newtons fur, so here are some of the pictures though out the various developmental stages.


 Final maya software settings with basic lighting and a sphere

Final Colour mapping/Direction and Clumping


Full body fur.


Final silhouette shape, as many of the film will be in silhouette this is a very important aspect, and hopefully looks ok!

This may look weird or like automatic mapping to begin with but...........

As we all know Maya can be rather moody, CRASH and simply refuse to comply with any of your wishes,  and this has never been such a problem as when I am asking the programme to work with fur maps. (for baldness, direction length ect)  This began to get me very annoyed as Maya, would never find the maps, load the wrong map, design its own maps and of course, Crash!  So I decided to avoid maps at all costs, the most important aspect of the appearence of the fur (besides from the shape of the strands themselves) would be the direction/baldness of the fur.  The placement, size and angle of the UV segments within the UV 1-1 Space can offer complete control of the aforementioned aspects of the strands/hair.  Without the need to create seperate maps.  Unfortunatly this does not apply to length which still creates random clumps and baldpatchs every time I click the length button that require an ENTIRE SYSTEM RESTORE to remove, I would upload a picture but i do not want to have to go through that again :(
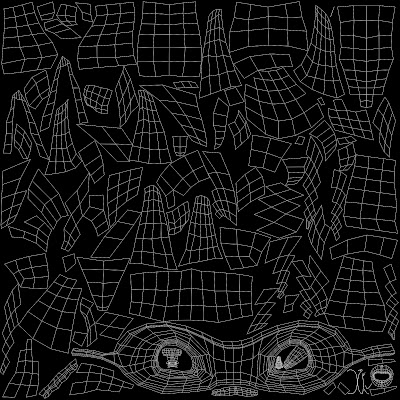
UV design,
 
The final facial texture.

Character development


 Concept paintings/simplifing the design

First character turnaround (rejected!!)

Finished Character Turnaround

Final Character design

The colours are highly likely to change to match the mood/swatch of the surrounding.